Meeting with Annette
To start off our day we first had a meeting with Annette who works with algae. We wanted to find a type that could be suitable for growing in spheres both aesthetically and practically and we were shown several different algal species of varying colours and consistences.
Many different types of algae in tubes for us to select
A few possible contenders
This algae was strongly considered for its colour, however, it had a very clumpy nature which we thought be unsuitable for our work
These were our final selections for the algae. The red was
the brightest and the most eye catching of the red and brown types that we
could find. The lime and dark green we thought were definitely the best of the
selection we were presented with in terms of their colour and the consistencies
of all the species seemed to be smooth, nicely distributed and suitable for our
purposes.
We also had a look at these ‘blue’ algae down in the cellar.
Unfortunately it wasn't growing very well and the colour was poor so it wasn't
that much of an option. We also saw an orange flask which contained algae that
had been treated with pesticide (below). Unfortunately these were not only a
nice colour, but also dead, so these would be completely unusable!
Pesticide treated algae
We also enquired about the possibility of using bio-luminescent algae which
could give some fantastic night-time displays. Unfortunately though, the
department didn't possess any of these species and we were informed that they
were difficult to grow. Also, despite having lit up spheres sounding like a
very nice idea, in reality the display would probably not be viewed in the dark
that often.
Another option would be to use halobacteria. Once again the department was currently
not in possession of any, also they grow in highly saline conditions which
would be unsuitable for any companion species. However, the salt would produce
some nice looking crystals for display and a nice pink colour. This could definitely
be an idea for use in the future, perhaps when spheres are been maintained and
replaced at a later date.
Our ideas for the algae involved making patterns inside the glass spheres. Agrose
gel could be swirled around and then algae would be grown on this gel to make
the pattern colourfully come alive. People could watch the algae grow over time
and the spheres could potentially last for several months before needing to be
maintained. During this maintenance period, the old sphere could be taken down
and replaced immediately with a new, already prepared sphere of a differing
design. The old sphere would then be cleaned out and prepared for future
displays. We would use agrose opposed to agar because even though it is a
little more expensive, it is also clearer and probably more suitable for an
artistic piece.
We started our experiments of this today (or yesterday by the time this post
gets published!). First we had six spherical flasks sterilized and we would be
experimenting with swirling agar over them that afternoon. Agar is cheaper than
agrose, so as these would only be experiments, we would use this material
instead. The three algae that we chose would ideally grow in two different environments,
however, the darker green one is apparently quite resilient and would grow on
the media of the other two selected species. The algae is rather slow growing
and we’ll have to wait quite some time to see results. Hopefully we’ll be
taking pictures of their growth process.
Our meeting with Annette also gave us some important information regarding
the technicalities of the spheres themselves. The spheres used for the final
artwork need to be autoclaved for the algae to grow in them. This process
involves heating the material to 121°C and a pressure of 1 bar
for 20 minutes, for the purpose of sterilization. There is also a question
hanging over how the spheres will be internally accessed. After this meeting I
sent an email to the company who we will probably order the test spheres from,
to ask both these questions and also ask about the prices for small 25cm
diameter spheres for tests and also the possibility of obtaining free samples.
If the spheres themselves can not be autoclaved, another possibility is to put
the small spherical flasks inside the sphere to create a sort of bunch of
grapes type image.
Potential problems with this experiment is that the algae may dry out and if
the container was sealed, the algae may not have enough air before they need to
be changed. However, having access to the outside may cause problems with fungi
and bacteria but a filter could possibly be used.
We will be testing out the spherical glasses this afternoon so read on to
see how we did!
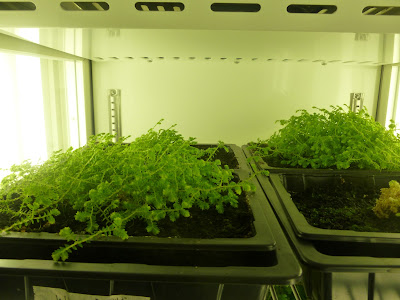
Our next task of the day was to meet with Stewart Casson to find out about
the possibility of growing a plant called selaginella in the spheres. We went down
into the basement of the department to take photos of some of the plant which
had already been grown in sealed containers for over a year with no maintenance
at all. This evidently could be a very interesting possibility of something
that could work for us.
Plants kept in the basement
When looking at the plants, although alive, many of them looked ill, droopy
and not very artistic. Condensation had collected on the inside of the
containers as well, which detracted from the appearance, although we speculated
that inside a sphere the water would probably be more likely to drip down to
the bottom. Further problems included that parts of the plants would naturally
die back in any case and some of the tests had become covered in algae. The
spheres would be a lot bigger than the tiny containers we saw, however, the
amount of selaginella inside it would also need to be proportionally bigger to
work as an artistic piece. Although very interesting, this idea doesn’t seem too plausible for a work
of art.
Top-right was more a less dead;
bottom-right was infected with algae. The other two were yellowing in places
and there was a lot of condensation inside the containers.
The Day's Research
This is a hall from Belgium where the ceiling is decorated with beautifully iridescent beetle shells.
 Initially our research for purchasing some materials online didn’t go
brilliantly. We wanted to obtain some iridescent beetle shells, however it proved
very difficult to find suppliers just for the shells. However, we did
eventually find this website http://www.insect-sale.com/
which stocked the whole (dead) insects. We looked through the list and picked
out several possible that were reasonably priced.
A possible alternative to using beetle shells, as
well as an idea in its own right, would be to use iridescent seashells.
Left, a possible contender for usable beetles.
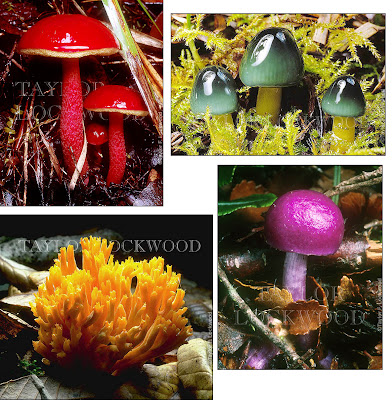
Other research included having a look at the possibility of growing fungi in the spheres. This website http://www.fungiphoto.com/ had some wonderful pictures, (a few inserted below) and definitley made us think of the possibility of obtaining some fungi growing kits.
We finished our research by sending of emails to various members of staff to arrange more meetings.
Testing with Annette at 3pm
The six spherical flasks that we had left with
Annette earlier had all been autoclaved, along with bottles, pipettes and six
lots of agar jelly (2x 1.4% 1.2% and 1%) that we would be using. Before we
could use the agar jelly medium, two other components also needed to be added
to it. These components didn’t work well if they were autoclaved already mixed
and so were added afterwards. These components were NaCO3 and
FeEDTA. Once added, the medium would contain all the necessary nutrients for
the algae to survive.
Next we tested the different concentrations of
agar, there seemed to be little difference in how they set. When we pipetted
the agar into the flasks, the agar was very reluctant to stick. We speculated
that this was because the insides of the flasks were wet. Next time it would be
important to ensure that the glass interior was dry. To get the agar to set/stick
better, we inferred that the larger the temperature difference, the better. We acted
on this by putting the flasks into an ice bucket to cool them down, both before
and after the agar was dripped inside. Also, from our experimenting we think
that the agar jelly would be most workable just on the point of setting, just
before clumps begin to develop.
Getting specific patterns of agar was in fact
quite difficult. The damp flask interior certainly didn’t help and getting the
precise looking swirls we originally intended was proving to be impossible and
quite fruitless. However, we found that shaking the sphere was the best way to
get the agar to stick to the sides. It actually made an organic, mosaic-like
pattern which we thought could actually be quite beautiful if the algae grew
well on it. Deciding to go with what we had, we inoculated our two best flasks
with the hardy, dark green Microcystis alga. This species is known to be good
at growing in variable conditions and we thought this one would have the best
chance of growing in our flasks.
We put the flasks into an incubator and we will
photograph them as they develop over the next few weeks.


