Day 10
Today was a pretty quiet day as we're still waiting on a lot
of orders, but we did get a few things done. Below are some sketches of concept
designs for how i thought the algae idea could work. I drew images of plates in
a sphere as well as a smaller image of using little spheres. The internal
tubing could be filled with algae or simply coloured or just some cord. Each
plate or small sphere could harbour a different sort of algae giving a variety
in colour. These designs however may look too cluttered in practice.
Jessica also made a mobile-type structure for how she
envisioned the algae Petri dishes could appear in the sphere.

The ant equipment also arrived. It contained a gel which would provide the
ants with all the nutrients they would need to survive. The idea was that the
ants would burrow tunnels through the gel and that their creation could be used
as an art piece. To obtain some ants we decided to contact Nigel Franks by
email. He did get back to us but said that unfortunately they only used one
type of ant in the lab here and that they would be useless for what we wanted
them to do. He did say he could tell us how to dig up some ants (which the
product itself recommended) but that it would be a laborious process which
would take days and days. I assume that this would be the case as it’s currently
wet and cold and we're not aware of where there are any ant colonies, as well
as perhaps needing a particular type. I know that if it was summer and I was
back home it would be very easy to obtain some ants as I have a very large colony
under my back garden patio! We did however decide to take his advice and order
some from the internet which we hope to arrive soon.

Image of the ant colony product.
We took some photos of the winogradsky columns today as well to see how they've changed in the last couple of weeks.


We went to Wilkinsons to see if they sold any climbing plants which we could
buy today and set up. Unfortunately they didn't have any but we discovered a
garden centre on the internet that isn't too far away. We are planning to take
a visit there next week hopefully to see if we can find anything.
Finally we arranged to speak with Melanie, a life science artist recommended
to us by Heather, at 10:00am tomorrow. We’ll be speaking with her on the phone
rather than Skype because she’s on the move and unavailable for a Skype
conversation.
Day 11
Call with Melanie
We spoke with Melanie in the morning to discuss any ideas and suggestions that
she may have for the project and ask for any advice she could give us in regards
of using living material in an art piece. Like Tomas, she said that she liked
the idea of running experiments in the spheres, as this would be more
interesting and engaging for the public. She felt that having models and structures
in particular would perhaps not be showing off what the department was all
about in such an engaging way. Unfortunately we feel as we did before that this
is simply not scientifically practical but I did think of a compromise
solution. When we were at the zoo, animals and plants were kept in their
displays and then there was an accompanying board outside to describe a little
bit about it. I thought that having displays in the sphere to represent the
research going on in the department, with a similar style board to explain its
representation for those who were interested, would be a nice idea. We also had
the idea from the start about having a changeable, experimental display sphere
in which people could display their work from time to time.
Melanie also suggested the possibility of doing something a bit more related
to biochemistry, rather than growing things. Biochemical reactions may create a
range of interesting colours. Perhaps the spheres within spheres idea I had for
the algae would be suitable for this. Each small sphere could contain a
different coloured solution, representing different biochemical experiments.
This would probably be easy to maintain and produce.
She also pointed out to us what we'd been thinking for quite awhile about
the timescale in which the art piece would be on display. This would be very
reflective of what could be used, as maintaining living things would be quite
costly over a long time period.
After the conversation, we thought that to be able to better represent the
departments, it would be a good idea to go and visit them and take photos of
the research that was going on. Also, for things like more chemical based
reactions, we would be mostly unable to replicate those ourselves and it would
be a much better use of time to simply go to the relevant department and
take pictures for Tomas of what we could find. Jessica spent the afternoon
today sending emails to every department to request permission to go and take
photos of current research.
Moss Balls
With a lamp and a bit of sunlight, we finally got the solar power pump to work a little. We tried the motor on its side in the original container but it didn't work very well as it just pushed all the balls into one area where they clumped and stopped moving. Here we set up a system of the pump pushing upwards, causing the moss balls to rise and fall if the correct level of power was used.
Meeting with Heather
Today we also had a catch up with Heather to discuss our progress and where
to go next. She requested that we could also construct a large model flower and
bee for a display for public engagement, including the Fascination of Plants
day and the Festival of Nature.(Websites linked below).
http://www.bnhc.org.uk/home/festival.html
http://www.bristol.ac.uk/botanic-garden/events/2013/84.html
I had an idea that we could paint the flower in UV paint to illustrate how a
bee would see it. The idea seemed to be quite popular. Heather showed us this
website http://www.naturfotograf.com/UV_flowers_list.html which had many images
of flowers under UV and would certainly be a great help in selecting one to
base our model on. I've been running through ideas in my head of how best to
construct the flower. Initially we were thinking plaster. I didn't like the
idea of using modrock however because it doesn’t give a smooth finish due to
the fibres in it. Pure plaster on the other can be sanded down to be made
smooth and doesn’t have the lumps and bumps from the structural material to
begin with. However I thought that this media would be a bit heavy, stiff and
chunky for a giant flower. It would be a flower ornament and wouldn’t have the
realism in texture and weight.
I thought the best material to use would be some sort of fabric. Fake,
fabric flowers are commonly made and I thought this was probably an idea worth
playing with. The main issue would be stiffening the structure in a giant
flower so that it didn't droop. I thought using interfacing or an internal wire
structure may work for this, while still preserving petal flexibility, which
plaster wouldn't do. The right sort of fabric would also give a closer
representation of a petals true sheen and hopefully a light, delicate look.
There are many online tutorials about how to make fabric flowers. This is an
example of one I looked at
http://www.simplyvintagegirl.com/blog/index.php/2010/05/29/tutorial-how-to-make-lovely-fabric-flowers/.
How to get the UV colour is a bit more complicated. While getting UV paint
and even UV fabric paint isn't difficult, to get both a material and a paint or
dye that will produce a decent finish could be more complex. From my experience,
fabric paint can make a material stiff, rough and hard and isn’t at all
suitable for painting the entire surface. It can look very obviously painted.
The range of quality in fabric paint obviously varies and apparently there are
some types which exist which don't look or feel much more different than if the
material was dyed.
UV fabric dye would certainly be preferable. With dye we could look at
applying the colour with tie-dye which when applied well can get very specific
patterns. Some of the UV patterns on the flowers seem to be very much made for
tie dye.


Unfortunately however, such a product simply seems very difficult to obtain.
It does exist but it either seems very expensive, very specific for certain
types of material, or just very limited in terms of its use and colour. I did
read about Remazol Fluorescent Yellow FL, a dye made by a German company called
Dystar. This is a true dye which binds irreversibly with fabric, it also seems
to be flexible in the sort of fabrics it will bind to and is truly fluorescent.
However, apparently you can only buy it in quantities of 5 kilos or more which
is, I’ve read, very expensive. How expensive though I just don’t know as there seems
to be nowhere to buy it! There is a lot of talk on the internet about it but it
seems to be impossible to obtain. I went to the Dystar website but it doesn't
give me prices for any of its products and wants me to make an account to buy
anything. It seems to be rather secretive about its business. Dylon apparently
also used to make some sort of UV fabric dye as well, but once again I can't
find anywhere to purchase it, plus even if I could purchase it, apparantly it
works better on silk than cotton and doesn't work on synthetic materials at
all. Buying the necessary quantity of silk would probably cost an arm and a
leg. The material is wonderful to use but it’s just too expensive. We will most
likely end up using some sort of synthetic material, possibly a type of satin,
simply for the sake of the budget.
Other ways of getting UV onto the material would be fabric paint, or
possibly spray paint may give a nice look, but this couldn't be applied with
tie-dye and probably wouldn't have the same nice finish. Furthermore, while it
seems easy enough to get invisible UV paint and visible UV fabric paint, it
seems to be hard to locate invisible UV fabric paint, which is what we want. My
searches also showed that such paints made the fabric stiff and hard.
I'm going home this weekend and do have a range of material scraps, some
fabric paint and fabric dyes, so I intend to have an experiment with what sort
of material takes best to dyes and fabrics. There is also a possibility of
using fabric pens/markers. I'm very puzzled about the difficulty of finding UV
fabric dye; it doesn't feel like it should be such a rare product. I'm quite
sure UV hair dye is common enough so maybe I'm just not looking in the right
places.
I find it quite amusing that I can obtain UV water dye
http://www.glowshop.com/product-p/uvwd50.htm but not fabric dye. If only we
could make a flower ice sculpture haha. The best UV product I could find today
was this:
http://www.uvpaint.co.uk/paint-usage-UVR.htm?gclid=CKmAx9TbwrYCFQrJtAodeXoAUQ
This paint came in a range of colours and dried clear in normal light. I assume
this implies that it could be overlaid onto another painted surface without
affecting the original colour, although the website stated that it worked best
on a light background. We could compensate for this by using a white or yellow
flower. There is however a problem in that using fabric would be difficult. The
point of the fabric was that it would give a weight and texture similar to a real
flower, the moment paint is applied it would lose these qualities. Unfortunately
I think we may have to look for some other sort of material to use. I had a
thought of using some sort of light, flexible plastic to cover the petals. This
would have the light, flexible nature of the fabric without the fibres.

Applying paint on it however could mean that if the petals
were moved the paint may crack. This would particularly be an issue if a preliminary
paint layer was placed underneath the UV for the visible light colour. Although
moving the petals would not be a particular feature of the model, the fact it
may have flexible petals makes it a potential problem worth considering. Ways
to get around this could be to use material that was already coloured and then
use invisible UV spray paint if we could get it. This should make the model
much less prone to cracking and remove any general appearance of paint strokes.
Despite the flower having lots of potential complications,
the bee seems to be quite easy in theory to construct. Jessica has already
started to create the underlying wire structure for the model. The furry parts
of the body should be easily replicable by using black and yellow fur fabric
which is quite easy to buy.
The wire structure for the bee abdomen and thorax.

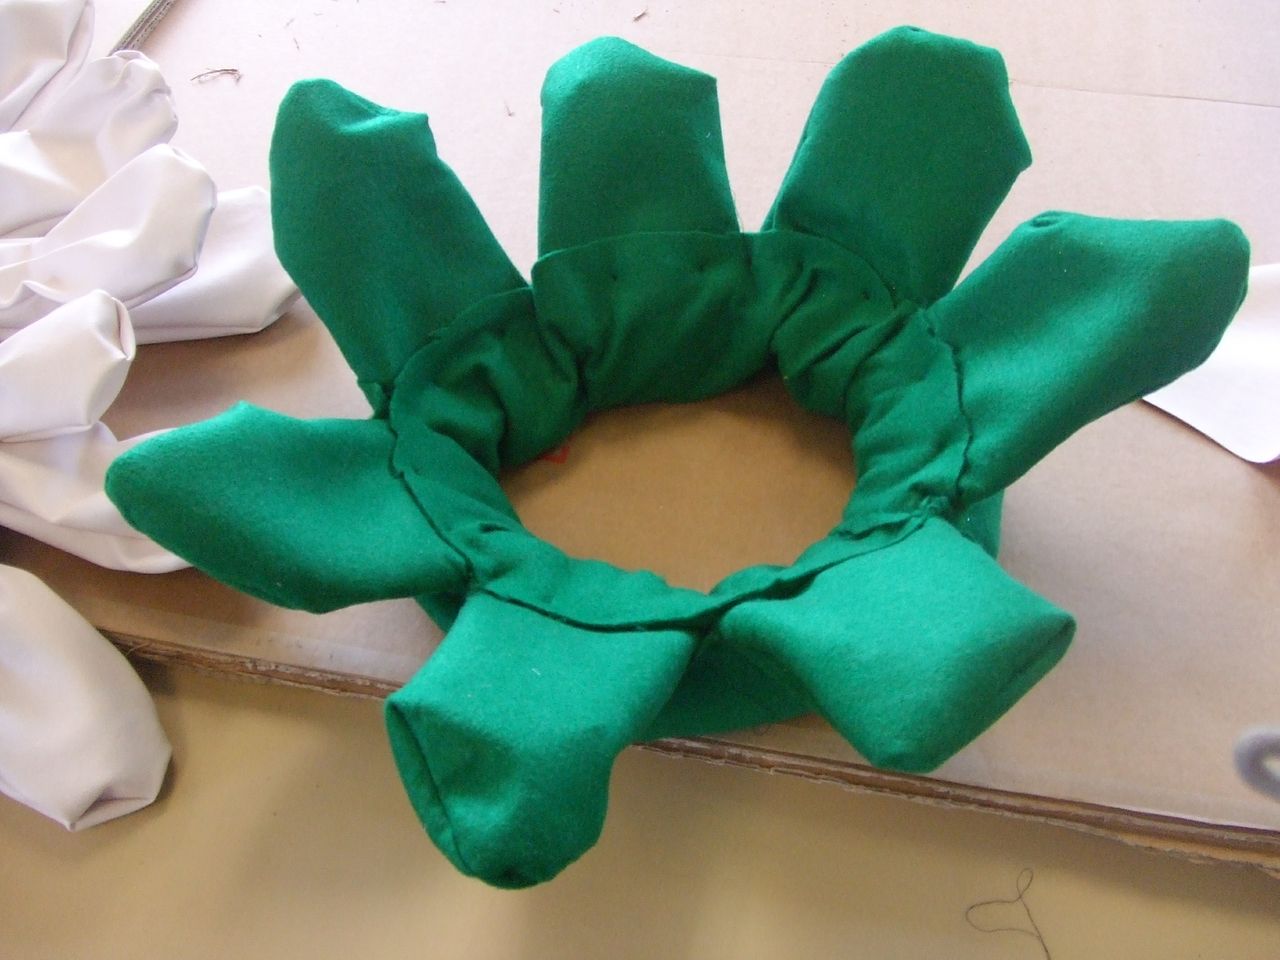
 I was tasked with making all the flower's petals which I managed to complete on the first day. Every petal had to be painstakingly cut out, machined and then hand stitched to give a ruffled effect.


